I am using both IDEs (although Eclipse is really a 'platform') and it's hard to decide which one is better for my development work. In my experience, more people use Eclipse than use NetBeans. Most projects I've worked on lately have used an Eclipse base. The beauty of Eclipse is in how 'pluggable' and extensible it is. There's just a lot of plugins available for Eclipse - and very useful ones at that! People I've talked to say it's easier to develop plugins for Eclipse than for NetBeans.
The extensibility of Eclipse though may cause first-time users to find it tedious. The basic distribution of the platform does basic things. If you want to do web development, for example, you'd need to separately download JEM, EMF, and other dependencies to get it to work. Because of how detached this process is, the folks at Eclipse also have a version of Eclipse (WTP) that comes with all dependencies preconfigured.
In NetBeans, on the other hand, you only do one download of their web pack, and you got all you need. The preview version (6.0-M) is slow to start (up to 2 minutes starting up??), but works great. All the tools you need are well integrated in the base version. I'd say NetBeans is more straight-forward and user-friendly than Eclipse. A lot of useful features have been added to NetBeans IDE, though others have been removed (and why?). For example, in 5.5, you can refactor and choose access modifiers for the class attributes on one screen. In 6.o, you only do refactoring with no options to change access modifiers. So you must manually add "private" where necessary. Little inconvenience.
The other drawback to NetBeans is that it only supports SJSAS for Java EE development. Otherwise, you can also have JBoss and Tomcat for J2EE 1.4. Eclipse offers a wider range of options for servers, if you specify .server properties correctly.
It'd appear that Eclipse is more advanced, but I think NetBeans has gotten better too. The stigma that NetBeans is a Sun tool is slowly eroding, paving the way for wider acceptance. I'd recommend that a developer be able to use both IDEs - although you can essentially do the same tasks with either.
My strategy: I use NetBeans to do samples and prototypes when I work on an Eclipse-based project - and then move the ideas to Eclipse for production, and vice versa. Keeps me plugged in on both IDEs.
Saturday, May 26, 2007
Wednesday, May 16, 2007
Simple Direct Web Remoting Application In NetBeans
I'd never really heard of Direct Web Remoting (DWR) until a contract interview yesterday. Basically, it is an open-source AJAX idea that works by creating server-side listener interfaces directly from Java classes, and allowing client-side JavaScript to call the interface methods asynchronously. It's a Web 2.0 technology that makes AJAX development a little easier. Implementing DWR is still quite a manual process though, as this example demonstrates.
Setup: NetBeans 6.0 Preview (M9, build 070502) with Sun Java System Application Server 9.1 (build b41d-beta2). JDK is 1.6.0-rc-b104. My whole setup is beta builds, but it works.
Objective: The web application we'll develop simply allows a client (web browser) to query the web server for its version and JDK information. The underlying mechanism will be DWR-based.
(1) Download the DWR library from the Getahead download site. Version used in this exercise is 2.0.1, so the jar file will be archived locally as dwr-2.0.1.jar.
(2) Create the web application: File | New Project -> Web | Web Application [Finish]. Name this application DWRFirst and let its web context remain /DWRFirst.
(3) Import the DWR library into the web application: right-click the web application, select Properties -> Libraries | Add Jar/Folder and browse to the DWR archive in #1 above. Ensure that package is checked for the JAR on the compile tab before clicking [OK] to exit.
(4) Create a JavaBean that will be the basis of generated JavaScript. The usual rules of creating JavaBeans/POJOs apply. The bean uses classes from the DWR library (see source - section#1). Ours will be Info.java in package beans (beans.Info).
(5) Update the web deployment descriptor to reference the DWR servlet. Initialization parameters are optional, but when specified, you can access this servlet normally to review the interfaces generated by DWR and get the correct JavaScript file sources, in addition to testing the methods that'll be available to the client.
- To add the servlet, double-click web.xml and click [Servlets] then [Add Servlet Element]. Name = dwr-servlet, class = org.directwebremoting.servlet.DwrServlet, url pattern = /dwr/*.
- You should set the servlet to run at startup, and can add the optional debug initialization parameters by clicking the Add button in the the Initialization Parameters section of the servlet declaration on this page. (source - section #2)
(6) Create a DWR configuration file (dwr.xml) in the web application's WEB-INF directory - same place as web.xml. This file advertises what classes DWR can create for remoting, and their JavaScript names.
- Right-click the web app, select New | Other ... -> XML | XML Document [Next].
- Provide name = dwr.xml, folder = web\WEB-INF, and click [Next].
- Select DTD Constrained document type and click [Next]. Public ID = -//GetAhead Limited//DTD Direct Web Remoting 1.0//EN, System ID = http://www.getahead.ltd.uk/dwr/dwr10.dtd, and root = dwr. [Finish].
- Within the config file, you need to allow visibility of the remote interface by specifying allow|create nodes (see source - section #3). The name visible to client-side JavaScript is specified by the 'javascript' attribute of the create element.
(7) Use the JavaScript in a JSP or HTML page. This is the usual order of business where you reference scripts and write JS methods and such. You should always import all 3 scripts (one with name specified in #6 above, the engine.js, and util.js). See source - section #4.
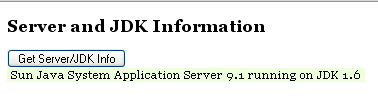
(8) Deploy the web application and access it at http://[server:port]/DWRFirst/. The deployment descriptor specifies that index.jsp should be called. When you click the [Get Server/JDK Info] button on the page displayed, DWR does it's AJAX magic and information is returned as shown below.
[Source Code]
Setup: NetBeans 6.0 Preview (M9, build 070502) with Sun Java System Application Server 9.1 (build b41d-beta2). JDK is 1.6.0-rc-b104. My whole setup is beta builds, but it works.
Objective: The web application we'll develop simply allows a client (web browser) to query the web server for its version and JDK information. The underlying mechanism will be DWR-based.
(1) Download the DWR library from the Getahead download site. Version used in this exercise is 2.0.1, so the jar file will be archived locally as dwr-2.0.1.jar.
(2) Create the web application: File | New Project -> Web | Web Application [Finish]. Name this application DWRFirst and let its web context remain /DWRFirst.
(3) Import the DWR library into the web application: right-click the web application, select Properties -> Libraries | Add Jar/Folder and browse to the DWR archive in #1 above. Ensure that package is checked for the JAR on the compile tab before clicking [OK] to exit.
(4) Create a JavaBean that will be the basis of generated JavaScript. The usual rules of creating JavaBeans/POJOs apply. The bean uses classes from the DWR library (see source - section#1). Ours will be Info.java in package beans (beans.Info).
(5) Update the web deployment descriptor to reference the DWR servlet. Initialization parameters are optional, but when specified, you can access this servlet normally to review the interfaces generated by DWR and get the correct JavaScript file sources, in addition to testing the methods that'll be available to the client.
- To add the servlet, double-click web.xml and click [Servlets] then [Add Servlet Element]. Name = dwr-servlet, class = org.directwebremoting.servlet.DwrServlet, url pattern = /dwr/*.
- You should set the servlet to run at startup, and can add the optional debug initialization parameters by clicking the Add button in the the Initialization Parameters section of the servlet declaration on this page. (source - section #2)
(6) Create a DWR configuration file (dwr.xml) in the web application's WEB-INF directory - same place as web.xml. This file advertises what classes DWR can create for remoting, and their JavaScript names.
- Right-click the web app, select New | Other ... -> XML | XML Document [Next].
- Provide name = dwr.xml, folder = web\WEB-INF, and click [Next].
- Select DTD Constrained document type and click [Next]. Public ID = -//GetAhead Limited//DTD Direct Web Remoting 1.0//EN, System ID = http://www.getahead.ltd.uk/dwr/dwr10.dtd, and root = dwr. [Finish].
- Within the config file, you need to allow visibility of the remote interface by specifying allow|create nodes (see source - section #3). The name visible to client-side JavaScript is specified by the 'javascript' attribute of the create element.
(7) Use the JavaScript in a JSP or HTML page. This is the usual order of business where you reference scripts and write JS methods and such. You should always import all 3 scripts (one with name specified in #6 above, the engine.js, and util.js). See source - section #4.
(8) Deploy the web application and access it at http://[server:port]

[Source Code]
Friday, May 11, 2007
Adding JSF to JSP-Based Applications (Manually)
So we know JSP is great for the presentation layer; but JavaServer Faces (JSF) makes it even easier. According to the "source" (Sun), JSF "offers a clean separation between behavior and presentation." Web applications built using JSF technology can "map HTTP requests to component-specific event handling and manage UI elements as stateful objects on the server." JavaServer Faces technology provides a rich architecture for managing component state, processing component data, validating user input, and handling events.
This example shows how to add JSF functionality to a JSP-based web application (manually). The application simply requests some user information (name, email, zip code), and displays it in the ensuing page upon submission (source code has samples of the plain JSPs). The example is done in NetBeans 5.5 (with SJSAS u9). The application server already supports JSF (reference implementation), so there's no need to add libraries and such. This example simply "activates" the JSF framework.
CREATE A JSF CONFIGURATION FILE
The faces-config.xml file defines the JavaBean as it'll be used in JSF pages, as well as introduce navigation rules (which page gets displayed when a link or button is clicked). Here's how it's done in NetBeans 5.5:
- Right-click the web application | New -> File/Folder -> XML -> XML Document [Next].
- Filename = faces-config; Folder = (browse) -> Web Pages -> WEB-INF [Next].
- Select DTD-Constrained Document [Next].
- Select DTD Public ID: "-//Sun Microsystems, Inc.//DTD JavaServer Faces Config 1.1//EN". DTD System ID: "http://java.sun.com/dtd/web-facesconfig_1_1.dtd". Document Root: "faces-config". [Finish].
= The configuration file is created in the appropriate location (WEB-INF).
CREATE THE MANAGED BEAN
- Next, create a JavaBean that will represent the data we will be gathering. The bean has the three properties (name, email, zip code), along with the appropriate setter/getter methods.
- New -> File/Folder -> Web -> JSF Managed Bean [Next].
- Class name: UserInfo. Package: beans. [Finish].
- In the class source, enter the bean properties as String variables.
- Right-click the source code and select Refactor -> Encapsulate Fields .... The wizard allows you to give the properties private access and to create setters/getters JavaBeans-style.
DEFINE THE NAVIGATION CASES
Navigation rules specify what page is displayed when the [Submit] button is clicked in the information request page, and where we do when the return link in the display page is displayed.
- Right-click the source of faces-config.xml and select JavaServer Faces -> Create Navigation Cases ...
- From view: /index.jsp. From action: submit. To view: /showinfo.jsp. Redirect: yes. This rule says that when we click the submit button in index.jsp, then showinfo.jsp will be displayed.
- Repeat for the return command: From view: /showinfo.jsp. From action: return. To view: /index.jsp. Redirect: yes.
MODIFY THE REQUEST AND DISPLAY JSP PAGES
The page index.jsp now needs to be rewitten with JSF markup. Basically, you import a couple of tag libraries (HTML and JSF core) and specify the form and view. Components (the input fields of the form) are connected to the JavaBean. The submit button is assigned an action. (see source).
- No longer need form tag attributes action and method, nor do we need parameter names for the input fields of the form. That's only the beginning of making things simpler.
- Everything inside the html tag gets additionally enclosed in a f:view tag.
- A form is enclosed in a h:form tag.
- index.jsp shows how to use h:inputText to connect the input fields the bean properties (set). It also shows how to use h:commandButton and set its action.
- showinfo.jsp shows how to read these properties and use h:commandLink.
UPDATE THE WEB DESCRIPTOR FILE
- So that web.xml defines the JSF configuration file and JSF default servlet.
You can access your now-JSF application by calling "index.faces" insteads of index.jsp.
[Source Code].
Subscribe to:
Posts (Atom)